แนะนำ Rest API
 สามารถดู video ของหัวข้อนี้ก่อนได้ ดู video
เราจะมาทำอะไรกันต่อ
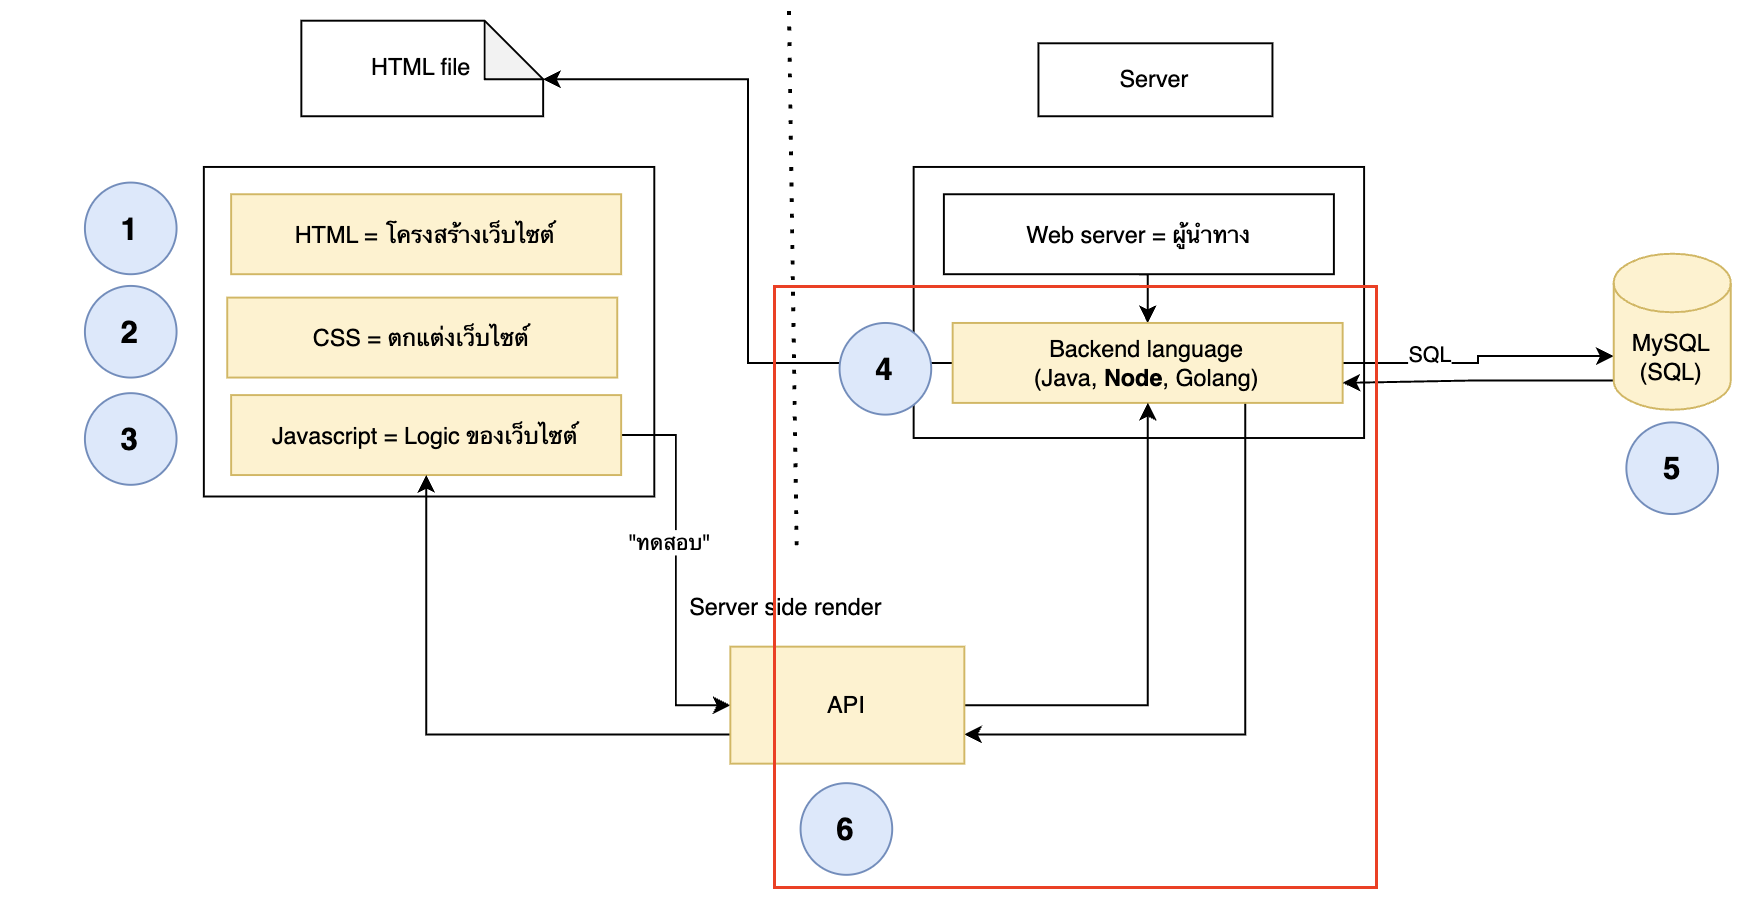
รู้จักกับ Rest API
REST ย่อมาจาก Representational State Transfer เป็นรูปแบบการส่งข้อมูลแบบหนึ่งที่ส่งผ่าจาก Client (เช่น จากหน้าเว็บ) สู่ Server (Backend เช่น nodejs) ซึ่ง REST นั้นจะอยู่บนพื้นฐานของ HTTP protocal ที่จะทำให้เราสามารถยิงข้อมูลผ่านจากการเปิด Web server ออกมาได้
ซึ่งวิธีการส่งด้วยรูปแบบ REST นั้น สามารถส่งได้หลากหลายประเภทข้อมูลตั้งแต่ Text (ข้อความปกติ), XML (ข้อความโครงสร้างคล้ายๆ HTML), JSON (ข้อความโครงสร้างคล้ายๆ Object ใน Javascript)
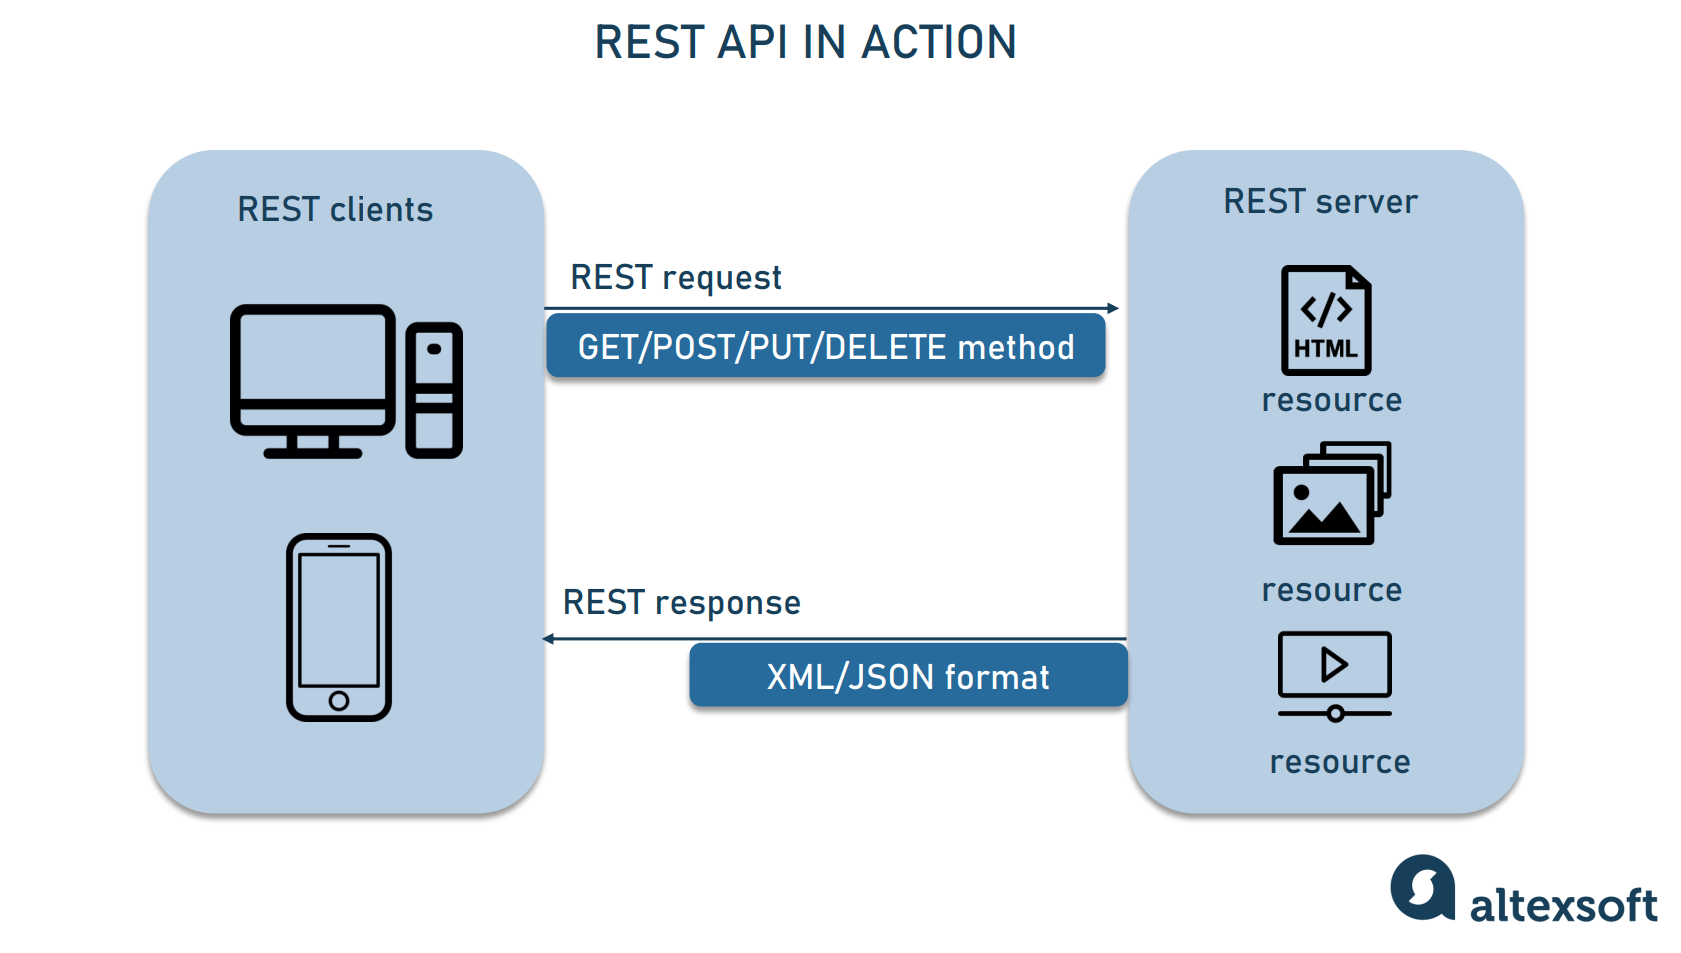
Ref: https://www.altexsoft.com/media/2021/03/rest_api_works.png
เพื่อให้เกิดความเข้าใจมากขึ้น เดี๋ยวเราจะมาทำ REST API ไปพร้อมๆกับอธิบายทีเดียว แต่เริ่มต้นเราจะลงสิ่งหนึ่งเพิ่มกันก่อน
แนะนำ library: express
ต้องบอกก่อน จริงๆ nodejs เองก็สามารถทำ http protocal แบบ REST API ออกมาได้ แต่มันจะ code ค่อนข้างเยอะพอสมควร ซึ่ง library เริ่มต้นสำหรับคนที่เริ่มต้นทำ REST API จะขอแนะนำ express (ดูตัวอย่าง code ในหัวข้อต่อไปได้)
เริ่มต้นเราจะทำการลง express กันก่อน สืบเนื่องจากบทที่ 7 (ที่เราลง nodejs กันไป)
เปิด Terminal ขึึ้นมา และเข้า folder server ด้วยคำสั่ง cd
cd server
recheck ด้วยการใช้คำสั่ง ls (หรือ dir ใน windows) ว่าอยู่ถูกที่แล้วหรือไม่ (ถ้าถูกต้อง จะต้องเจอ package.json ตามภาพนี้)

ใช้ library ใน nodejs (เป็นตัวช่วยทำให้ทำงานง่ายขึ้น)
ใน Terminal พิมพ์คำสั่งนี้เพื่อทำการลง package
npm install express
คำสั่งนี้มีความหมายว่า npm install <package อะไร> ในการลง package ของ node จะลงด้วยคำสั่งนี้ (ชื่อ package จะขึ้นอยู่กับ library ที่เราจะลงเพิ่ม)
ดูผลลัพธ์ผ่าน package.json ได้ ตรง dependency จะต้องมี express ขึ้นมาแบบนี้
// file: package.json
{
  "name": "server",
  "version": "1.0.0",
  "description": "",
  "main": "index.js",
  "scripts": {
    "test": "echo \"Error: no test specified\" && exit 1"
  },
  "author": "",
  "license": "ISC",
  "dependencies": {
    "express": "^4.18.2"
  }
}
ถ้าขึ้นมาลักษณะนี้ถือว่าถูกต้องแล้ว แปลว่าเป็นการลง library เรียบร้อย (ทุกการลง library จะเป็นแบบนี้เสมอ อีกศัพท์ที่เราจะพูดกันคือลง dependency)
ลองเทียบ code แบบ ใช้ กับ ไม่ใช้ express
ไม่ใช้ express (nodejs ปกติ)
const http = require('http')

// Sample book data
const books = [
  { id: 1, title: 'Book 1', author: 'Author 1' },
  { id: 2, title: 'Book 2', author: 'Author 2' },
  { id: 3, title: 'Book 3', author: 'Author 3' },
]

const server = http.createServer((req, res) => {
  if (req.url === '/api/books' && req.method === 'GET') {
    // Set the response header
    res.setHeader('Content-Type', 'application/json');
    // Send the list of books as JSON
    res.end(JSON.stringify(books));
  } else {
    // Handle other routes
    res.statusCode = 404;
    res.end('Not Found');
  }
})

const port = 3000;
server.listen(port, () => {
  console.log(`Server is running on port ${port}`)
})
กับใช้ express
const express = require('express')
const app = express()

// Sample book data
const books = [
  { id: 1, title: 'Book 1', author: 'Author 1' },
  { id: 2, title: 'Book 2', author: 'Author 2' },
  { id: 3, title: 'Book 3', author: 'Author 3' },
]

// Endpoint to get all books
app.get('/api/books', (req, res) => {
  res.json(books)
})

const port = 3000;
app.listen(port, () => {
  console.log(`Server is running on port ${port}`)
})
2 code นี้ทำงานให้ผลลัพธ์ออกมาเหมือนกัน แต่อย่างที่ทุกคนเห็น
- ฝั่ง nodejs ต้องประกาศการสร้าง server ด้วย createServer แต่ฝั่ง express แค่ใช้ listen ก็สามารถเปิดได้แล้ว
- api ก็เช่นเดียวกัน ฝั่ง nodejs ต้องใช้ if / else ในการแยก แต่ฝั่ง express สามารถใช้
app.get()ออกมาได้เลย
เดี๋ยวเราจะมาลงรายละเอียด code ในหัวข้อต่อไป