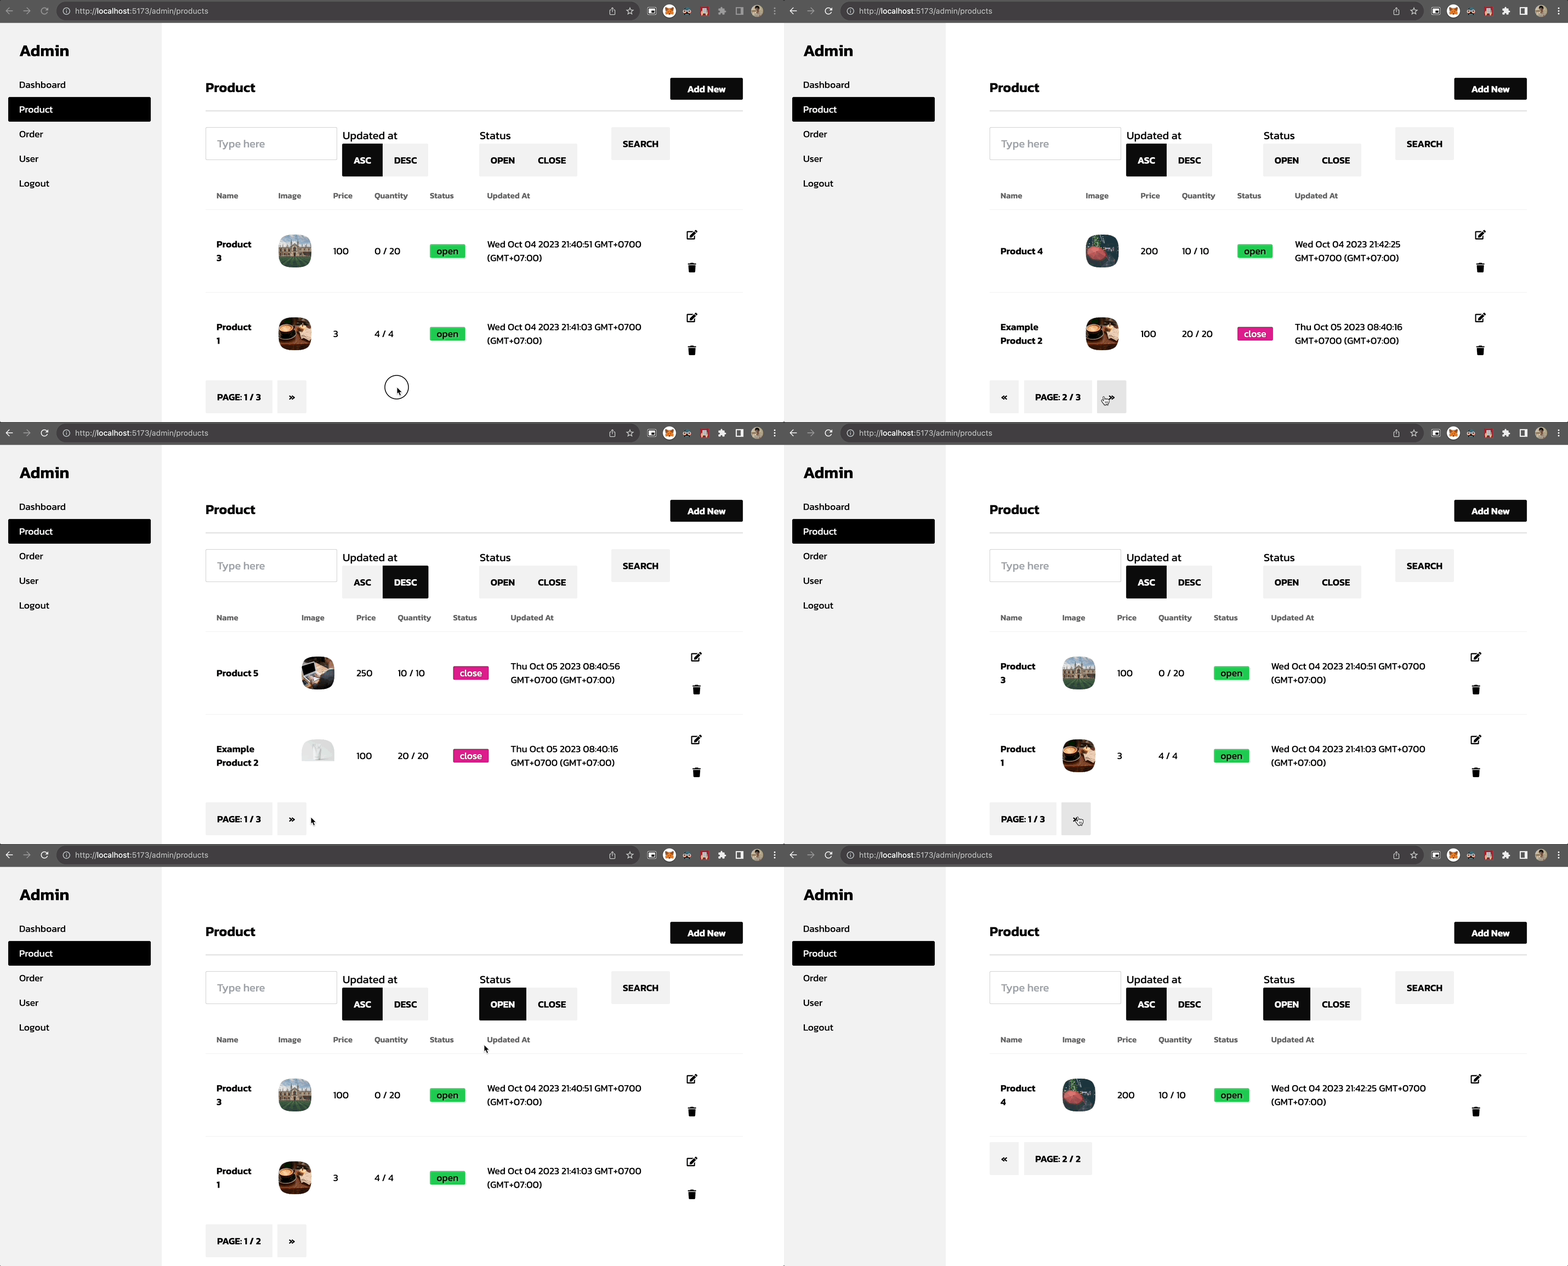
เพิ่ม pagination ใน product
เราจะทำอะไรกันต่อ
เอกสารต้นฉบับ: https://firebase.google.com/docs/firestore/query-data/query-cursors
Step ต่อไปเราจะเพิ่ม pagination กัน (ในกรณีที่ข้อมูลเยอะ จะได้สามารถค่อยๆหยิบมาแสดงออกมาได้)
Pagination ที่เราจะทำกัน
- เราจะเพิ่ม Next (ไปหน้าต่อไป), Previous (กลับหน้าที่แล้ว) และแสดงหน้าและหน้าทั้งหมด ออกมา
- Limitation ของ Firestore คือ จะไม่สามารถทำ Paging ตามหน้าได้ (จริงๆ สามารถทำได้แต่จะเปลือง Quota มาก) ** ถ้าใครอยากทำ Pagination แบบนั้น ให้ลองดูหัวข้อ Firestore Bundle เพิ่มเติมก่อนได้ (แต่เดี๋ยวทางเราจะมีคำแนะนำตอนท้าย)
เพิ่ม Store ให้ support pagination
ที่ไฟล์ stores/admin/product.js
- ใช้ limit แยกข้อมูล
- ใช้ start, end สำหรับแบ่งส่วนข้อมูล
import { defineStore } from 'pinia'

import {
  collection,
  getDocs,
  doc,
  addDoc,
  getDoc,
  setDoc,
  deleteDoc,
  query,
  where,
  orderBy,
  // เพิ่ม function สำหรับการทำ pagination เข้ามา
  limit,
  limitToLast,
  getCountFromServer,
  startAfter,
  endBefore
} from 'firebase/firestore'

import { db } from '@/firebase'

export const useProductStore = defineStore('product', {
  state: () => ({
    docList: [],
    total: 0,
    page: {
      activePage: 1
    },
    search: {
      text: '',
      status: '',
      sort: 'asc'
    }
  }),
  getters: {
    // เพิ่ม totalPage เพื่อให้แสดงจำนวนหน้าทั้งหมดออกมา
    totalPage (state) {
      return Math.ceil(state.total / 2)
    }
  },
  actions: {
    async loadProduct () {
      try {
        /* query ด้านบนเหมือนเดิม */

        const countProductQuery = query(
          productsCol,
          orderBy('updatedAt', this.search.sort),
        )

        productsCol = query(
          countProductQuery,
          limit(2) // เพิ่ม limit เข้ามา
        )

        const productSnapshot = await getDocs(productsCol)
        this.docList = productSnapshot.docs || []
        this.page.activePage = 1

        // calculate total
        const allSnapshot = await getCountFromServer(countProductQuery)
        this.total = allSnapshot.data().count
      } catch (error) {
        console.log('error', error)
      }
    },
    // เพิ่ม function สำหรับ load หน้าต่อไปมา
    async loadNextProduct (mode) {
      let productQuery = query(
        collection(db, 'products'),
        orderBy('updatedAt', this.search.sort),
      )
      if (this.search.status) {
        productQuery = query(
          productQuery,
          where('status', '==', this.search.status),
        )
      }
      if (mode === 'next') {
        const lastDocument = this.docList[this.docList.length - 1]
        productQuery = query(
          productQuery,
          startAfter(lastDocument),
          limit(2)
        )
      } else {
        const firstDocument = this.docList[0]
        productQuery = query(
          productQuery,
          endBefore(firstDocument),
          limitToLast(2)
        )
      }
      const productSnapshot = await getDocs(productQuery)
      this.docList = productSnapshot.docs
    }
  }
})
เพิ่ม Page component
- เพิ่ม
components/Pagination.vue
<script setup>
import { defineProps, computed } from 'vue'

defineProps({
  maxPage: Number,
  activePage: Number,
  changePage: Function
})
</script>

<template>
  <div class="join mt-2">
    <button
      v-if="activePage - 1 > 0"
      class="join-item btn mr-2"
      @click="changePage(activePage-1)">
      «
    </button>
    <button class="join-item btn mr-2">
      Page: {{ activePage }} / {{ maxPage }}
    </button>
    <button
      v-if="activePage + 1 <= maxPage"
      class="join-item btn"
      @click="changePage(activePage+1)">
      »
    </button>
  </div>
</template>
เรียกใช้ Pagination จากหน้า ListView
<script setup>
const productStore = useProductStore()

const changePage = async (page) => {
  const mode = page > productStore.page.activePage ? 'next' : 'previous'
  productStore.page.activePage = page
  await productStore.loadNextProduct(mode)
}
</script>

<template>
  <AdminLayout>
    <div class="flex-1  pt-8 px-6 bg-base-100">
      <div class="card w-full p-6 mt-2">
        <div class="h-full w-full pb-6 bg-base-100 mt-2">
          <div class="overflow-x-auto w-full">
            <!-- code ตารางส่วนเดิม, เพิ่ม pagination ต่อท้ายตารางมา  -->
            <Pagination
              :maxPage="productStore.totalPage"
              :activePage="productStore.page.activePage"
              :changePage="changePage"
            ></Pagination>
          </div>
        </div>
      </div>
    </div>
  </AdminLayout>
</template>
ผลลัพธ์ของการเพิ่ม pagination
