รู้จักกับ Docker และ Container
มาทำความรู้จัก Docker กันก่อน
สำหรับใครที่ยังไม่มีพื้นฐานการใช้ Docker เลยขอแนะนำหัวข้อนี้ก่อน Docker (for development)
จาก idea ของ Docker นั้น ทำให้เราสามารถที่จะสร้าง application โดยการทำ image ออกมา และนำ image นั้นไป build "ที่ใดก็ได้" ตราบเท่าที่ support Docker ได้ ซึ่งในปัจจุบัน นอกเหนือจากพวก cloud server ทั่วไป Service serverless หลายๆตัว support การ build ผ่าน docker image เช่นเดียวกัน (รวมถึงตัวที่เราหยิบมาด้วย)
ในหัวข้อนี้เราจะพามาลอง build Docker image golang เพื่อเตรียมสำหรับนำ image ไปใช้งานในการ Deploy กัน
Dockerfile คืออะไร ?
Dockerfile คือ text document ที่ประกอบไปด้วย set ของคำสั่ง (instructions) และ commands ที่ใช้สำหรับการ bulid Docker image โดยเป็นเหมือนพิมพ์เขียวของ การสร้างตัว image นั้นขึ้นมา เพื่อใช้สำหรับการนำไป build บน container ต่อไป โดย Dockerfile นั้นจะทำ�การ automates process การประกอบร่างตัว image จากคำสั่งที่กำหนดใน Dockerfile ขึ้นมาได้
นี่คือตัวอย่างของ Dockerfile
# Start from the latest golang base image
FROM golang:latest

# Set the Current Working Directory inside the container
WORKDIR /app

# Copy go.mod and go.sum files first; they are less frequently changed than source code, so Docker can cache this layer
COPY go.mod go.sum ./

# Download all dependencies
RUN go mod download

# Copy the source from the current directory to the Working Directory inside the container
COPY . .

# Build the Go app
RUN go build -o main .

# Expose port 8080 to the outside world
EXPOSE 8080

# Command to run the executable
CMD ["./main"]
ไอเดียหลักๆของ Dockerfile และคำสั่งพื้นฐานที่ใช้มีดังนี้
-
Base Image ทุกๆ Dockerfile จะทำการเริ่มต้น จาก Base Image (Image พื้นฐานที่ใช้เป็นตัว runtime ของ Docker) โดยจะเริ่มจากการใช้คำสั่ง
FROMโดยการระบุสิ่งนี้เป็นการระบุ image สำหรับการเริ่มต้น build ของ image นี้ โดยปกติก็จะเป็นพวก OS เช่น ubuntu, alpine หรือพวก pre-built image อย่าง nodejs หรือ golang (เป็นตัว runtime สำหรับการ run application) -
คำสั่ง run command คำสั่ง
RUNใช้สำหรับการรันตัว command ภายในตัว image ซึ่งโดยปกติก็จะมี process ตั้งแต่ การลง software ภายในเพิ่ม, การ build หรือ compile code หรือการเปลี่ยน configuration ต่างๆ โดยในการใช้คำสั่งRUNทุกรอบก็จะเป็นการสร้าง layer ใหม่ของตัว Docker image ขึ้นมา (ขึ้นเป็น step แต่ละขั้นในการ build docker image) -
**คำสั่ง เพิ่ม file ** คำสั่ง
ADDและCOPYเป็นคำสั่งใช้สำหรับการเพิ่ม file หรือ directory จาก host file system (เช่นจากเครื่อง local หรือเครื่อง server ที่กำลัง build docker image ตัวนี้อย�ู่) เข้าสู่ตัว Docker image
- คำสั่ง
COPYจะตรงไปตรงมาคือใช้สำหรับการ copy local file เข้ามา - คำสั่ง
ADDนั้นจะมี process เพิ่มมาคือการ automatically การบีบอัด file รวมถึงสามารถ fetch file จาก URL เข้ามาได้
-
คำสั่ง set ENV คำสั่ง
ENVใช้สำหรับการ set ค่า environment variables ภายใน image (พวกค่า environment ที่ใช้ใน application) ซึ่งสามารถกำหนดได้ทั้งผ่าน path และ ใส่ค่าโดยตรงเข้าไป -
คำสั่งส่ง Port ออกมา คำสั่ง
EXPOSEเป็นการบอกกับ Docker ว่า Container ตัวนี้กำลังมีการ listen port ภายใน network อยู่ โดยจะเป็นการระบุ Port ออกมาว่า กำลัง run Port อะไรออกมาตอนที่ application กำลัง run อยู่ที่ runtime เพื่อใช้สำหรับการ communication ภายใน container ด้วยกัน หรือภายใน host ของเครื่องที่กำลัง run อยู่ เพื่อให้สามารถเรียกใช้งาน Container นั้นผ่าน port ที่ส่งออกมาได้ -
คำสั่ง default command คำสั่ง
ENTRYPOINTและCMDเป็นการกำหนด default command สำหรับการเริ่มต้น Image ซ��ึ่งโดยปกติจะใช้หลังจากที่ install ทุกอย่างเรียบร้อยแล้ว (เปรียบเหมือนเราลง go package ทุกอย่างครบ ก็จะทำการเริ่ม run application ด้วยคำสั่งgo runเพื่อเริ่มต้นใช้งาน application golang) โดย
ENTRYPOINTเป็น set ของ command สำหรับการเริ่มต้นCMDเป็นคำสั่งสำหรับการ default arguments ของENTRYPOINT- โดยปกติ ถ้า command มี argument จะนิยมใช้
CMDกัน แต่ถ้ามีการใช้งานร่วมกันทั้งคู่CMDก็จะนำ argument ไปต่อกับENTRYPOINTอีกที
- คำสั่ง default directory คำสั่ง
WORKDIRเป็นการกำหนด working directory ที่ใช้ร่วมกับคำสั่งRUN,CMD,ENTRYPOINT,COPY,ADDเพื่อเป็นการกำหนด directory สำหรับการทำงานคำสั่งนี้
- โดยหากไม่มีการระบุ
WORKDIRภายใน Dockerfile จะถือว่าเป็นการใช้ defaultWORKDIRของตัว base image นั้นๆแทน
และสุดท้ายเมื่อทำการเขียน Dockerfile ได้เรียบร้อย ตัว docker เองก็ได้เตรียมคำสั่งสำหรับการ build image ไว้��คือ docker build เมื่อไหร่ก็ตามที่เราทำการ build เสร็จเรียบร้อย ตัว image นั้นจะถูกเก็บไว้กับ docker โดยสามารถตรวจสอบผ่านคำสั่ง docker images ออกมาได้

สร้าง application ตั้งต้น
เริ่มต้น เราจะมี structure ของ file go application ตามนี้
.
├── go.mod
├── go.sum
├── docker-compose.yml
├── main.go
└── models.go
โดย โจทย์ของตัว application ของเราคือ
- เราจะทำการสร้าง Web server ขึ้นมาสำหรับจัดการ user (CRUD user) โดย source code นี้จะเป็นการหยิบจากบทของ ตอนที่ 5: GORM และ Fiber มาใช้งาน
โดยเริ่มต้นถ้าเรา development application ทุกอย่างออกมาเรียบร้อยแล้ว
- มีไฟล์
go.modและgo.sumที่เกิดขึ้นจากgo mod init <ชื่อ package> - ทำการลง package สำหรับ Fiber / GORM และ env (สำหรับการอ่านค่า config) เอาไว้ให้เรียบร้อย (มีการลง
godotenvเนื่องจากเราจะต้องใช้envสำหรับการเปลี่ยน environment ตอนขึ้นไปบน server)
go get github.com/gofiber/fiber/v2
go get gorm.io/gorm
go get gorm.io/driver/postgres
go get github.com/joho/godotenv
- ทำการเพิ่ม
docker-compose.ymlสำหรับ run postgres เพื่อทดสอบ database
version: '3.8'

services:
  postgres:
    image: postgres:latest
    container_name: postgres
    environment:
      POSTGRES_DB: mydatabase
      POSTGRES_USER: myuser
      POSTGRES_PASSWORD: mypassword
    volumes:
      - postgres_data:/var/lib/postgresql/data
    ports:
      - "5432:5432"
    restart: unless-stopped

  pgadmin:
    image: dpage/pgadmin4:latest
    container_name: pgadmin
    environment:
      PGADMIN_DEFAULT_EMAIL: [email protected]
      PGADMIN_DEFAULT_PASSWORD: admin
    ports:
      - "5050:80"
    depends_on:
      - postgres
    restart: unless-stopped

  # เพิ่มสำหรับทดสอบการ run app บน network เดียวกัน
  myapp:
    build: .
    ports:
      - "8000:8000"
    environment:
      - DB_HOST=postgres
      - DB_PORT=5432
      - DB_USER=myuser
      - DB_PASSWORD=mypassword
      - DB_NAME=mydatabase
    depends_on:
      - postgres
    restart: unless-stopped

volumes:
  postgres_data:
- และนี่คือตัว source code สำหรับการ build image ครั้งนี้โดย source code นั้นจะเหมือน ตอนที่ 5: GORM และ Fiber แต่จะมีการเพิ่มเรื่องการเรียกใช้งาน
envเข้ามา
- main.go
- models.go
package main

import (
  "fmt"
  "github.com/gofiber/fiber/v2"
  "gorm.io/driver/postgres"
  "gorm.io/gorm"
  "gorm.io/gorm/logger"
  "github.com/joho/godotenv"
  "log"
  "os"
  "strconv"
  "time"
)

func main() {
  // Load .env file
  err := godotenv.Load()
  if err != nil {
    log.Fatalf("Error loading .env file")
  }

  // Read database configuration from .env file
  host := os.Getenv("DB_HOST")
  port, _ := strconv.Atoi(os.Getenv("DB_PORT")) // Convert port to int
  user := os.Getenv("DB_USER")
  password := os.Getenv("DB_PASSWORD")
  dbname := os.Getenv("DB_NAME")

  // Configure your PostgreSQL database details here
  dsn := fmt.Sprintf("host=%s port=%d user=%s "+
    "password=%s dbname=%s sslmode=disable",
    host, port, user, password, dbname)

  // New logger for detailed SQL logging
  newLogger := logger.New(
    log.New(os.Stdout, "\r\n", log.LstdFlags), // io writer
    logger.Config{
      SlowThreshold: time.Second, // Slow SQL threshold
      LogLevel:      logger.Info, // Log level
      Colorful:      true,        // Enable color
    },
  )

  db, err := gorm.Open(postgres.Open(dsn), &gorm.Config{
    Logger: newLogger,
  })

  if err != nil {
    panic("failed to connect to database")
  }

  // Migrate the schema
  db.AutoMigrate(&Book{})

  // Setup Fiber
  app := fiber.New()

  // CRUD routes
  app.Get("/books", func(c *fiber.Ctx) error {
    return getBooks(db, c)
  })
  app.Get("/books/:id", func(c *fiber.Ctx) error {
    return getBook(db, c)
  })
  app.Post("/books", func(c *fiber.Ctx) error {
    return createBook(db, c)
  })
  app.Put("/books/:id", func(c *fiber.Ctx) error {
    return updateBook(db, c)
  })
  app.Delete("/books/:id", func(c *fiber.Ctx) error {
    return deleteBook(db, c)
  })

  // Start server
  log.Fatal(app.Listen(":8000"))
}
package main

import (
  "github.com/gofiber/fiber/v2"
  "gorm.io/gorm"
)

type Book struct {
  gorm.Model
  Name        string `json:"name"`
  Author      string `json:"author"`
  Description string `json:"description"`
}

// getBooks retrieves all books
func getBooks(db *gorm.DB, c *fiber.Ctx) error {
  var books []Book
  db.Find(&books)
  return c.JSON(books)
}

// getBook retrieves a book by id
func getBook(db *gorm.DB, c *fiber.Ctx) error {
  id := c.Params("id")
  var book Book
  db.First(&book, id)
  return c.JSON(book)
}

// createBook creates a new book
func createBook(db *gorm.DB, c *fiber.Ctx) error {
  book := new(Book)
  if err := c.BodyParser(book); err != nil {
    return err
  }
  db.Create(&book)
  return c.JSON(book)
}

// updateBook updates a book by id
func updateBook(db *gorm.DB, c *fiber.Ctx) error {
  id := c.Params("id")
  book := new(Book)
  db.First(&book, id)
  if err := c.BodyParser(book); err != nil {
    return err
  }
  db.Save(&book)
  return c.JSON(book)
}

// deleteBook deletes a book by id
func deleteBook(db *gorm.DB, c *fiber.Ctx) error {
  id := c.Params("id")
  db.Delete(&Book{}, id)
  return c.SendString("Book successfully deleted")
}
- โดย code ในส่วนนี้นั้นจะมีการเรียกใช้งาน
envด้วย จาก config ของ GORM เราจะต้องเพิ่มไฟล์.envเข้าไป เพื่อเป็นการกำหนด config เริ่มต้นของ database ให้กับ GORM โดยจะทำการเริ่มทดสอบจากการต่อเข้าdocker-compose.ymlเข้าไปก่อน
DB_HOST=localhost
DB_PORT=5432
DB_USER=myuser
DB_PASSWORD=mypassword
DB_NAME=mydatabase
หลังจากนั้นทำการ run application ขึ้นมา
go run .
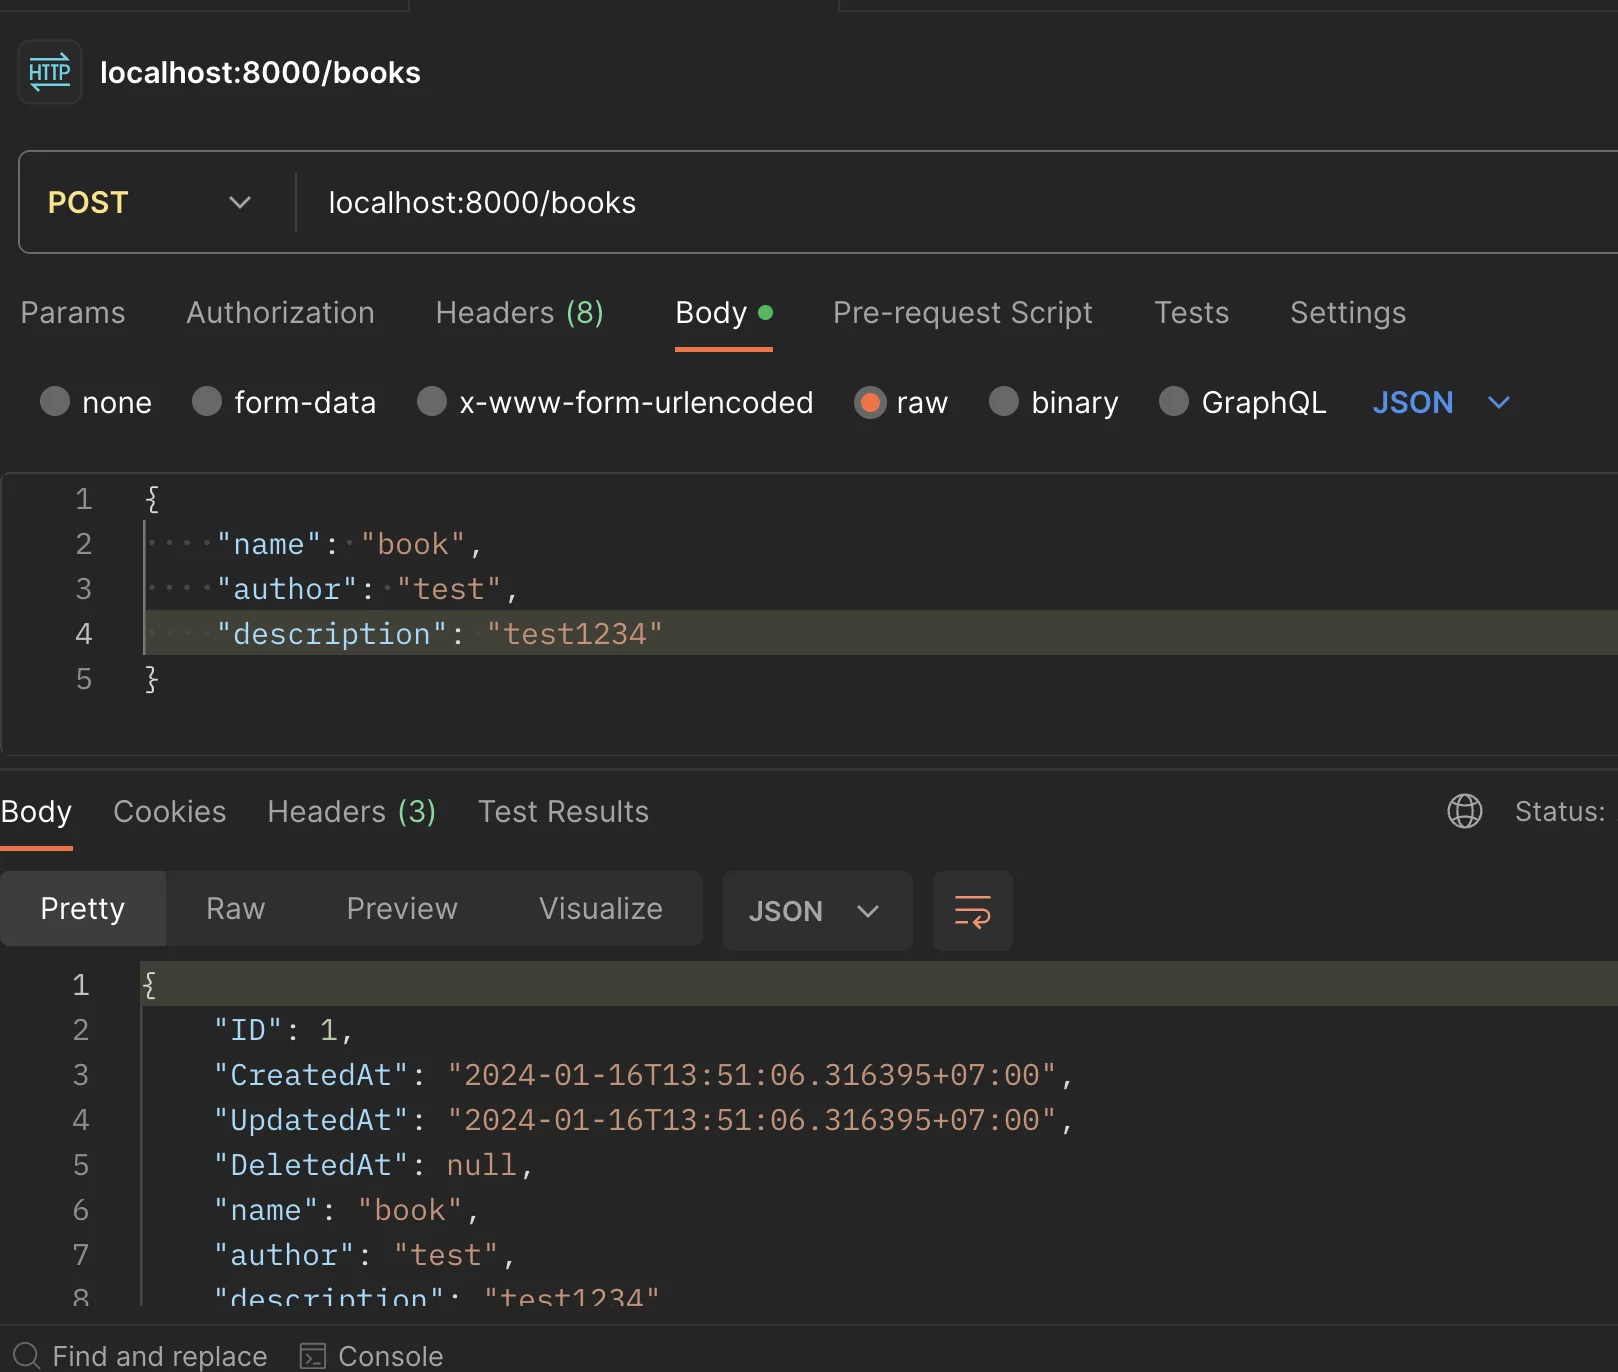
เมื่อทำการ run project ขึ้นมาเราก็จะได้ web application ที่ run Fiber และ GORM ออกมาที่สามารถ ยิง request CRUD ของเส้น /users ออกมาได้
ผลลัพธ์จะออกมาได้ประมาณนี้ ที่สามารถส่งข้อมูลเข้าไปได้
เริ่มสร้าง Dockerfile
มาเริ่มต้นเขียน Dockerfile สำหรับห่อ Go application เป็น image กัน โดยคำสั่งที่ใช้ก็จะมีตามนี้
# เริ่มต้นหยิบ golang image มาเป็น base image
FROM golang:latest

# ทำการกำหนด path /app เป็น directory เริ่มต้น
WORKDIR /app

# Copy go.mod และ go.sum ไฟล์เข้ามา
COPY go.mod go.sum ./

# Download dependencies ทั้งหมด
RUN go mod download

# Copy the source จาก directory ปัจจุบัน สู่ working directory ภายใน container
COPY . .

# Build the Go app
RUN go build -o main .

# Expose port 8000 ออกมาภายนอก
EXPOSE 8000

# ทำการ run command ผ่าน binary file ที่ build มาได้
CMD ["./main"]
เมื่อเขียน Dockerfile เสร็จ ทำการ build image ของ go application
docker build -t myapp .
(สำหรับ Mac) ทำการเปลี่ยน .env เป็น
DB_HOST=docker.for.mac.host.internal
DB_PORT=5432
DB_USER=myuser
DB_PASSWORD=mypassword
DB_NAME=mydatabase
หลังจากนั้นลอง run ด้วยคำสั่ง
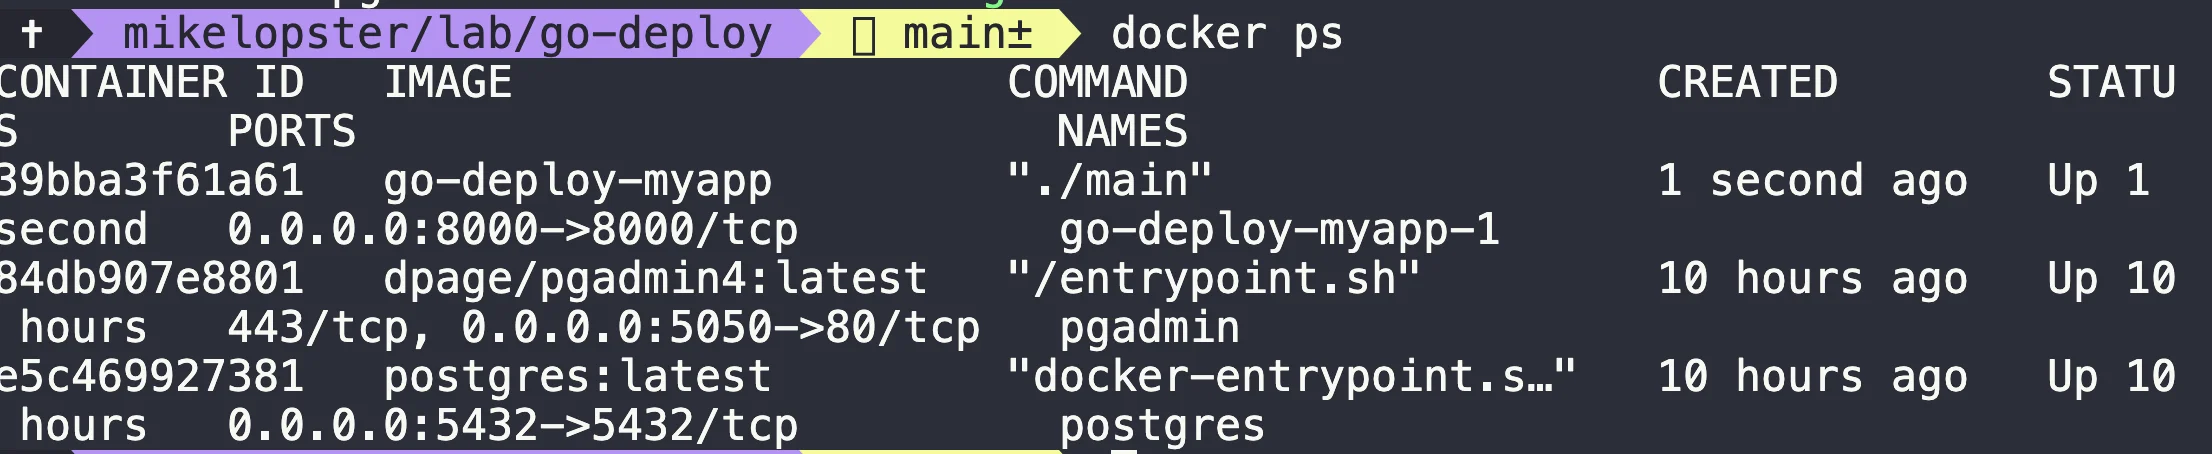
docker run -d -p 8000:8000 --env-file .env myapp
ก็จะสามารถ run application ตัวนี้ออกมาที่ docker ได้
หรือ ลองนำ image มาต่อเข้ากับ docker-compose โดยการเพิ่มไปใน docker-compose.yml เพื่อทดสอบว่าเชื่อมต่อติดหรือไม่ (ถ้าเป็นวิธีนี้สามารถใช้ .env เหมือนเดิมได้)
version: '3.8'

services:
  postgres:
    image: postgres:latest
    container_name: postgres
    environment:
      POSTGRES_DB: mydatabase
      POSTGRES_USER: myuser
      POSTGRES_PASSWORD: mypassword
    volumes:
      - postgres_data:/var/lib/postgresql/data
    ports:
      - "5432:5432"
    restart: unless-stopped

  pgadmin:
    image: dpage/pgadmin4:latest
    container_name: pgadmin
    environment:
      PGADMIN_DEFAULT_EMAIL: [email protected]
      PGADMIN_DEFAULT_PASSWORD: admin
    ports:
      - "5050:80"
    depends_on:
      - postgres
    restart: unless-stopped

  # เพิ่มสำหรับทดสอบการ run app บน network เดียวกัน
  myapp:
    build: .
    ports:
      - "8000:8000"
    environment:
      - DB_HOST=postgres
      - DB_PORT=5432
      - DB_USER=myuser
      - DB_PASSWORD=mypassword
      - DB_NAME=mydatabase
    depends_on:
      - postgres
    restart: unless-stopped

volumes:
  postgres_data:
เมื่อทำการทดสอบ run ด้วย docker-compose up ออกมา ก็สามารถ run application แบบเดียวกันออกมาได้